Advanced Git and GitHub
GitHub Features
GitHub is a massive platform that adds features all the time. While we won’t cover all of them, there are a few that are worth highlighting.
Repositories
While you have already created a GitHub repository, it’s worth taking a moment to talk about what a repository is and how it works.
Just to reiterate, repositories are the core of GitHub and git, and are essentially like folders in Google Drive. They are where all the files, code, and data for a project is stored, along with version histories of them. On GitHub, as you’ve seen now, repositories can be either public or private. Public repositories are visible to anyone, while private repositories are only visible to the owner and collaborators.
Repository Structure
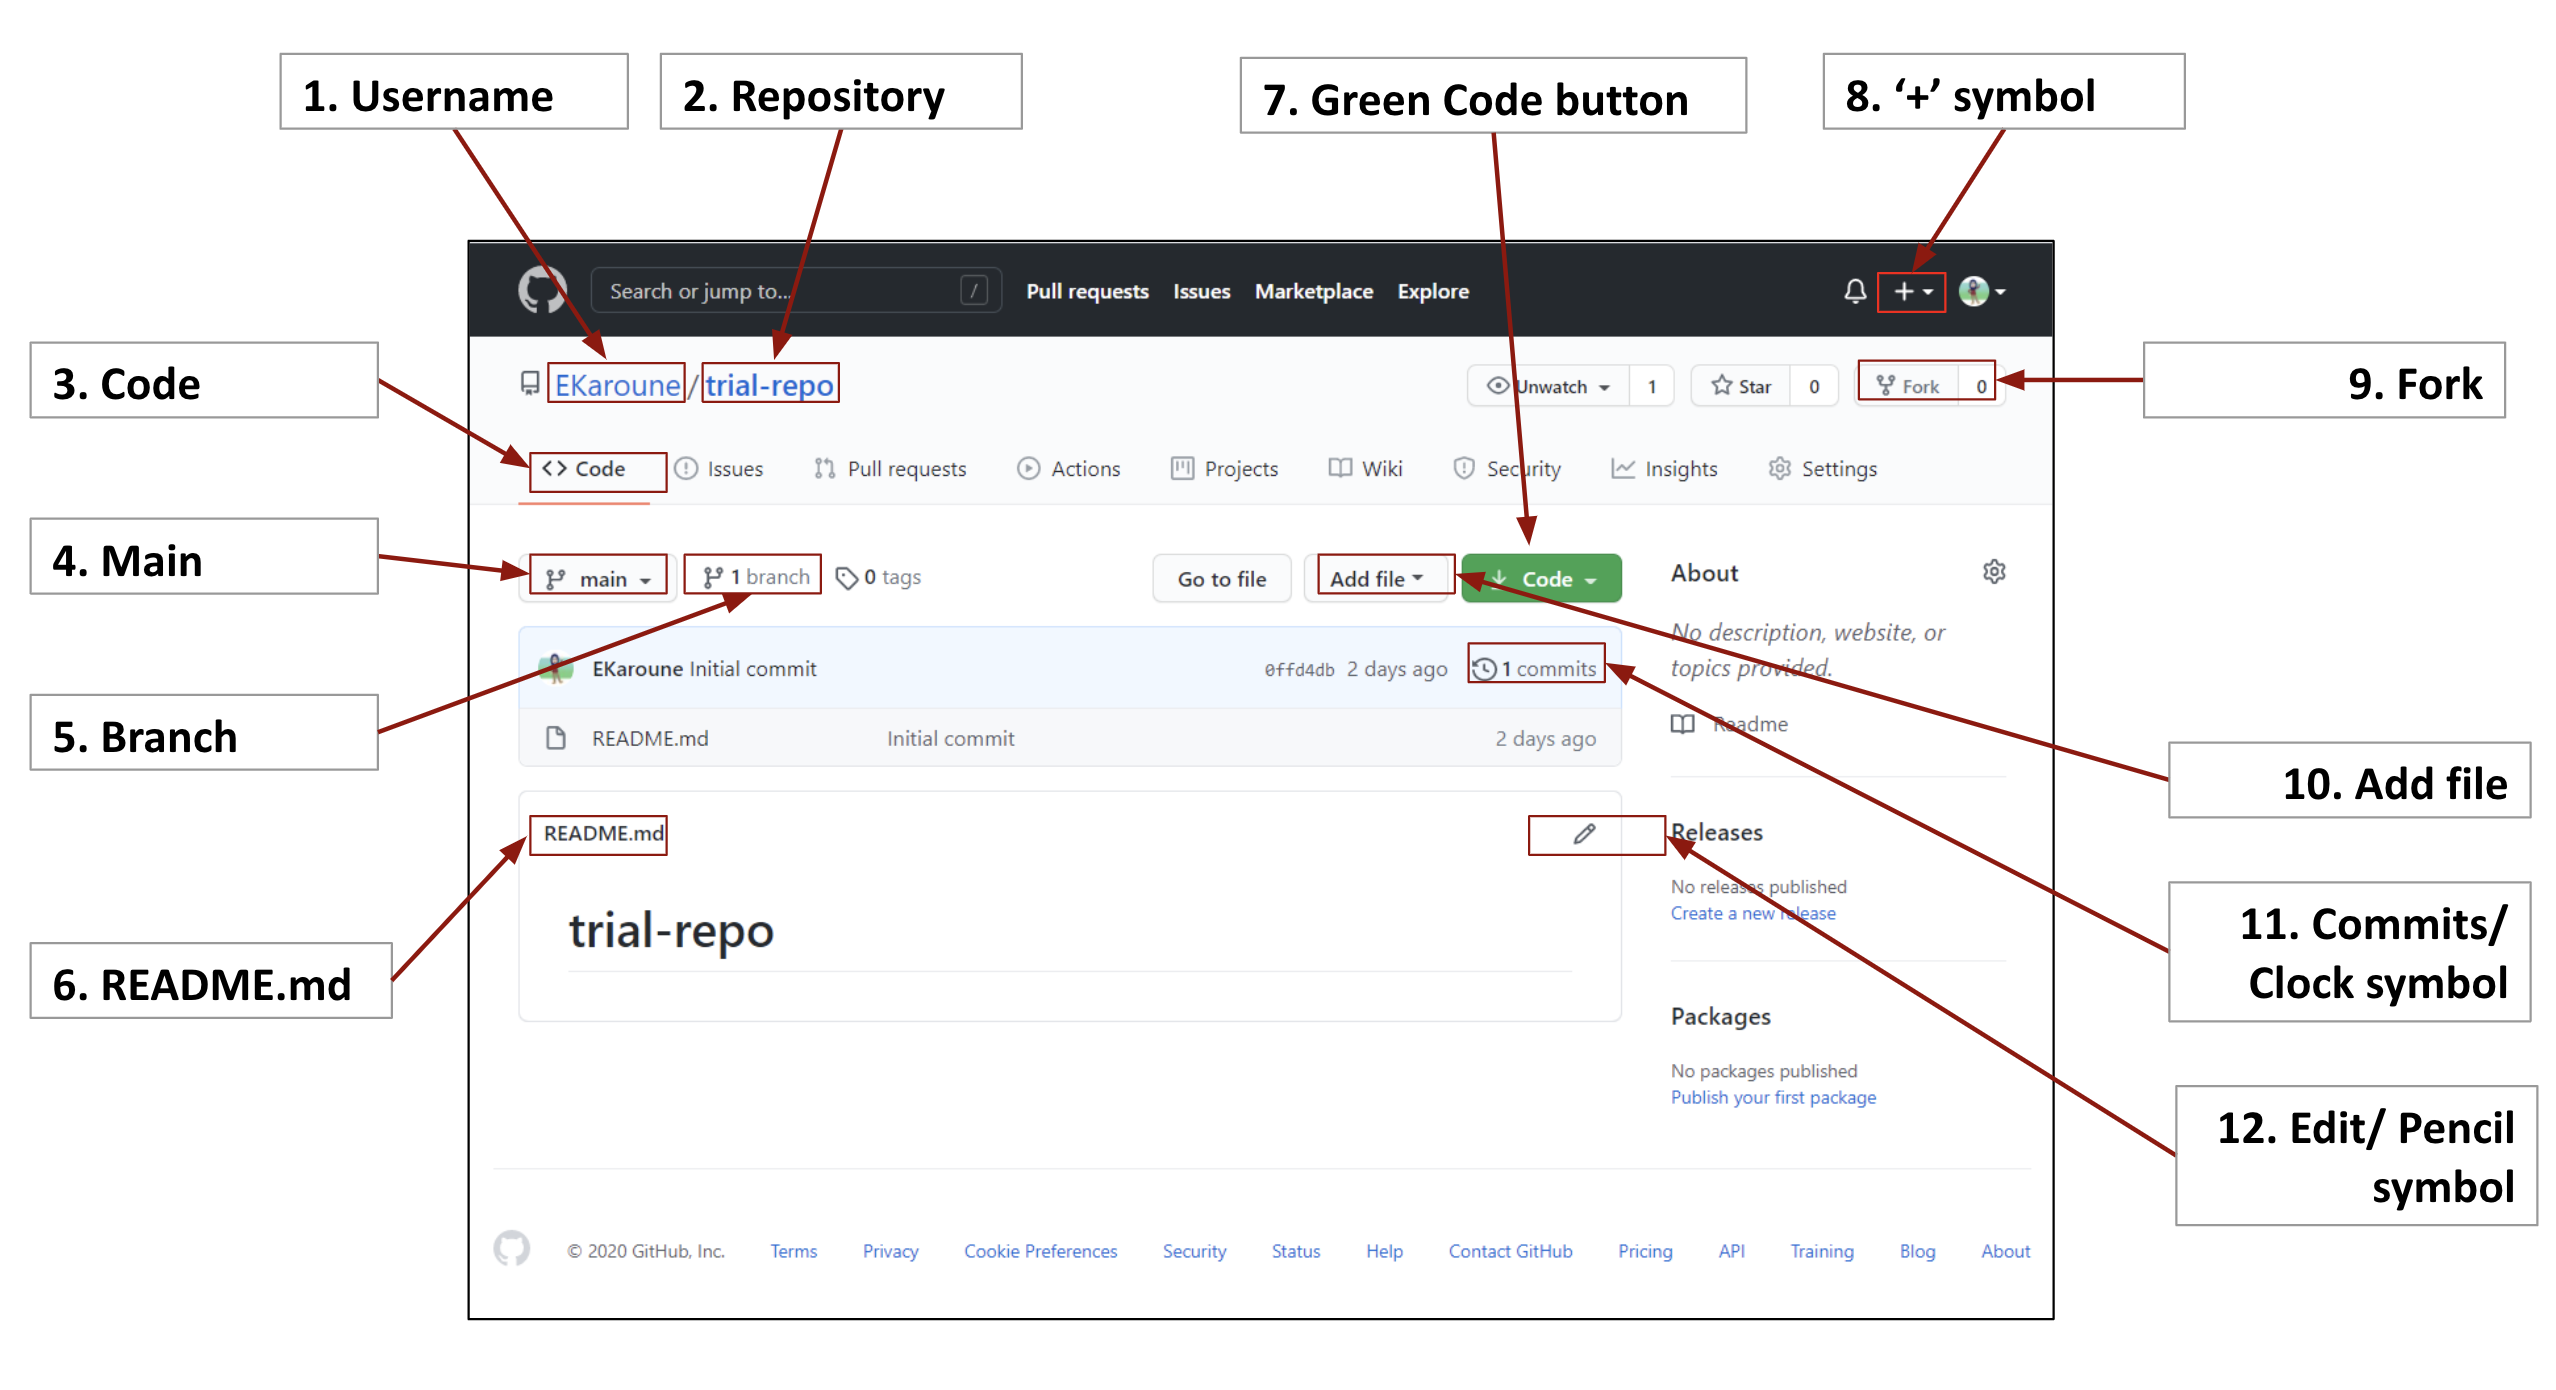
In the diagram above, you see the basic structure of a repository, which consists of:
-
Username: This is the owner of the repository. In the case of our course website, the owner is me (
ZoeLeBlanc) whereas in this example, the username isEKaroune. -
Repository: This is the name of the repository (or you can think of it as a project directory). In this example, the repository name is
trial-repo. -
Code: The top of the repository has a series of tabs. This first tab brings you back to your landing page for the repository and shows you the folders and files that are in the repository.
-
Main: This indicates the branch you are viewing in the repository. We’ll discuss branches in more detail below.
-
Branch: If you click on this button, you’ll see a page that lists all the branches in repository. You can select which one to view from this page or the drop-down menu.
-
README.md file: This is a special file that GitHub displays. It serves as an introduction to your GitHub repository, and often includes the repository name, details on how to use it, and specifics about the license.
-
Green Code Button: This button allows you to download the code for the repository. You can download it as a zip file or clone it using the command line.
-
+ symbol: This button allows you to create a new repository.
-
Forks: This button allows you to fork a repository. Forking a repository creates a copy of it in your own GitHub account. We’ll discuss more below.
-
Add File: This button allows you to add a new file to the repository.
-
Commits/Clock symbol: This shows you the commit history for the repository. You can click on the commit to see what changes were made. Remember commits are the saved snapshots, so this shows you how many have been made and when.
-
Edit/Pencil symbol: This button allows you to edit the README.md file.
Repository Features
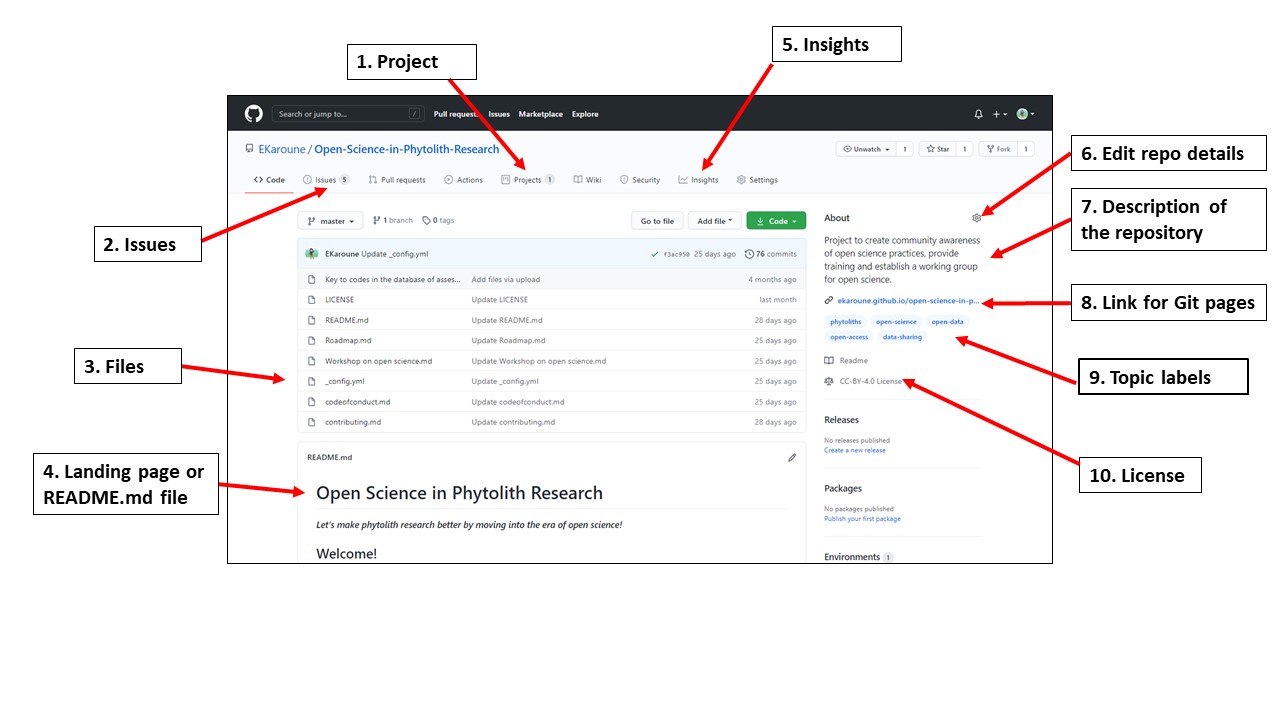
- Projects: This tab allows you to create a project board for the repository. Project boards are a way to track tasks and issues related to a project. They are a way to organize work and can be used to coordinate work between collaborators. You can read more about GitHub Projects here https://docs.github.com/en/issues/planning-and-tracking-with-projects/learning-about-projects/about-projects.
- Issues: This tab takes you to the issues page for the repository. You can read more about GitHub Issues below.
- Insights: This tab takes you to the insights page for the repository. You can read more about GitHub Insights below.
- Edit Repo Details: This button allows you to edit the repository details, including the name, description, and license.
- Description of the repository: This is the description of the repository. It is a good idea to include a description of the repository so that others can understand what it is about. However, GitHub will only render a few sentences so it’s best to keep it short.
- Link for GitHub Pages or Website: This is the link to the GitHub Pages site for the repository. We’ll be discussing GitHub Pages more soon, but generally it’s a good idea to link to your website here.
- Topics: This is where you can add topics to your repository. We’ll discuss topics more below GitHub Topics below.
- License: This is where you can add a license to your repository. We’ll discuss licenses more in-depth later in the semester.
Insights
You can view the activity on a repository by clicking on the Insights tab. This will show you a graph of the activity on the repository, including activity by contributors, under the Contributors tab.

For example, this image is of the insights page on GitHub one of the most popular Computing in the Humanities projects, The Programming Historian. Highly worth checking out if you’re interested in learning about more advanced programming topics and how they relate to the humanities!
Issues
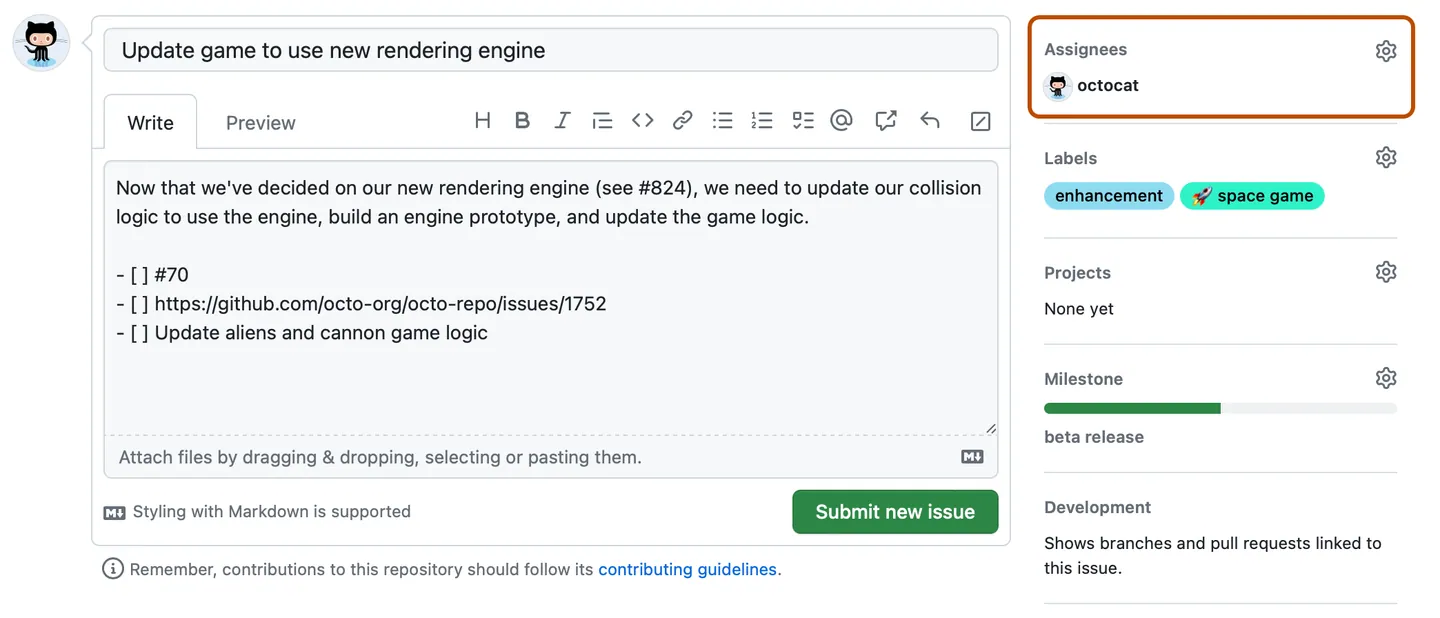
Issues are a way to track bugs, feature requests, or other tasks related to a project. They are a way to track the development of a project and can be used to coordinate work between collaborators. Issues can be assigned to specific users, labeled, and commented on. They can also be closed when the issue is resolved. You can read more about GitHub Issues here https://docs.github.com/en/issues/tracking-your-work-with-issues/about-issues.
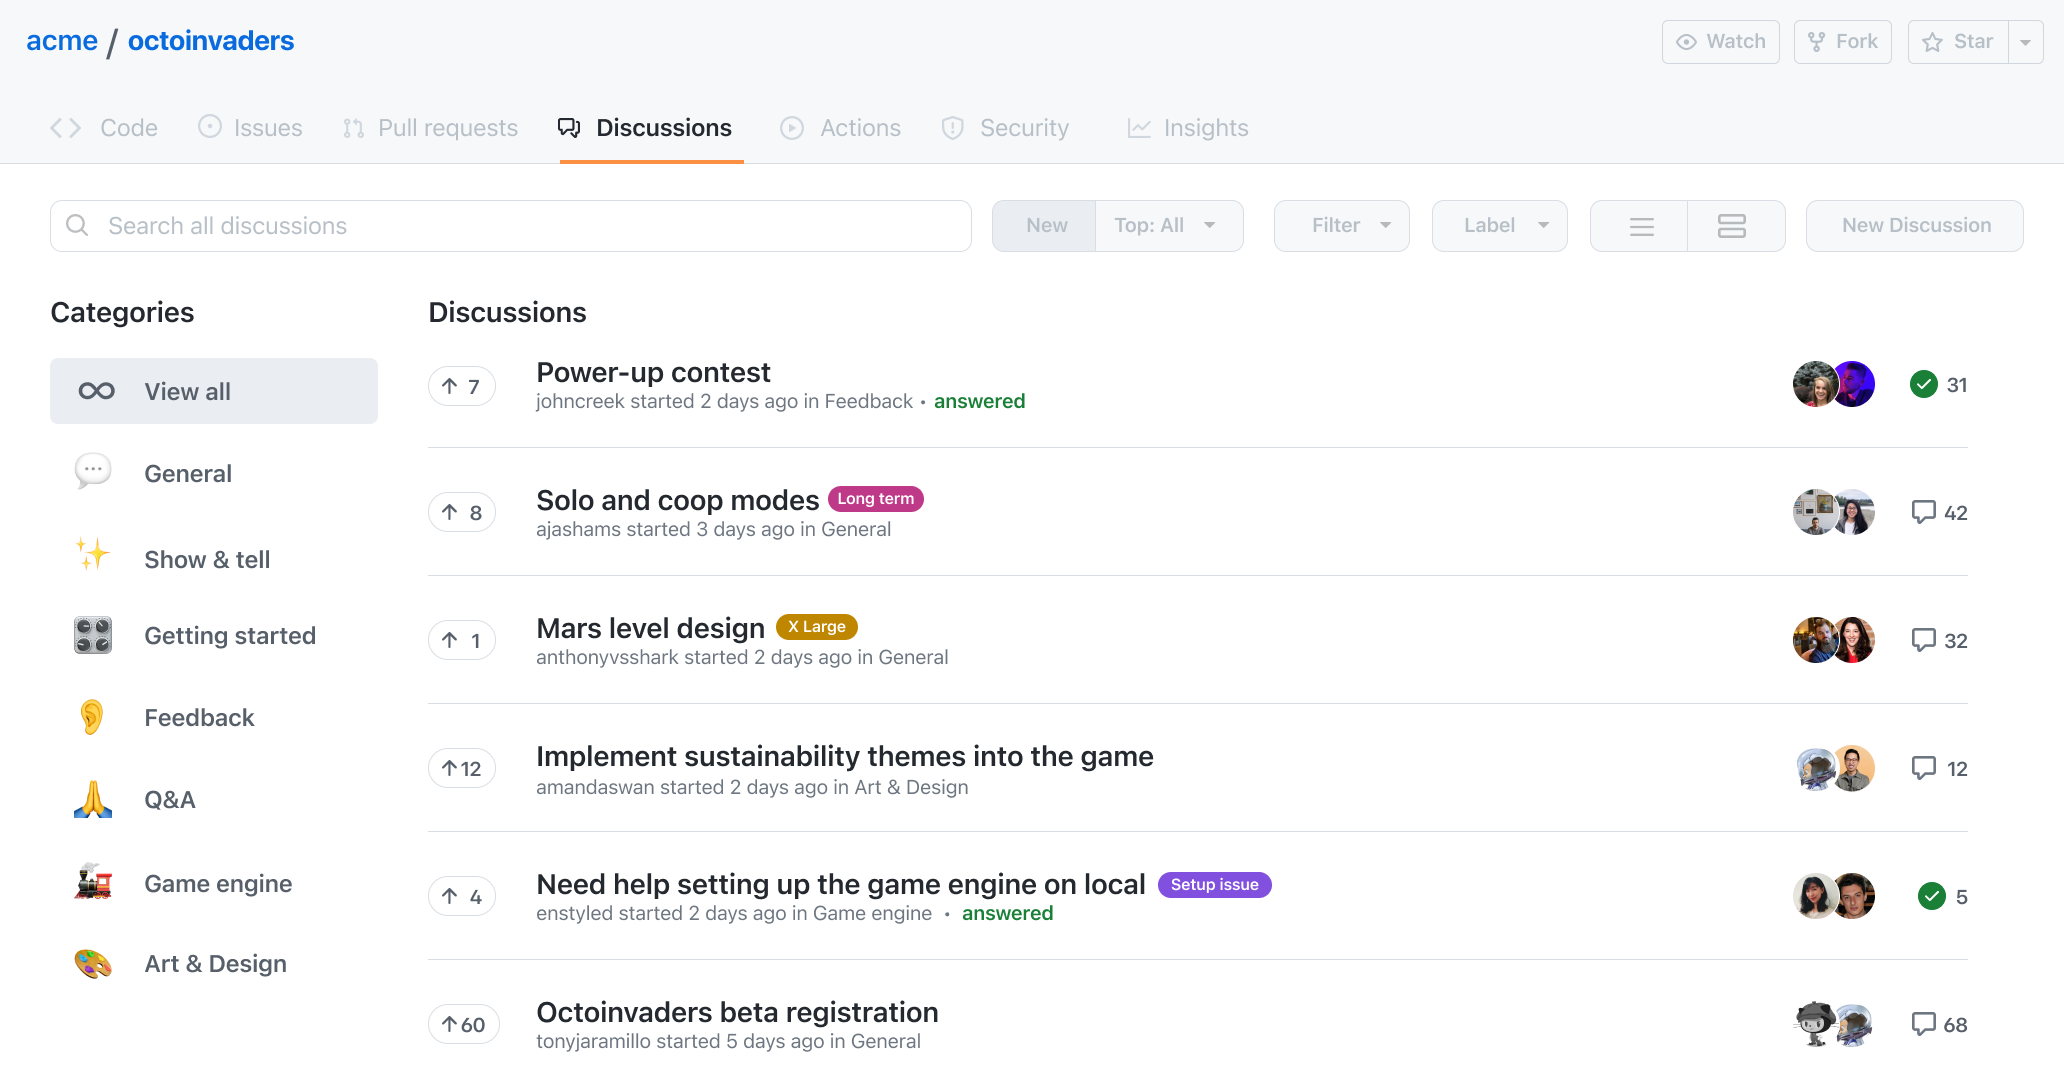
Discussions
We will be using discussions extensively this semester, but generally you can think of them as a forum. They are similar to issues, but are more open-ended and can be used for general questions or conversations. They are most commonly used to build community around a project, but I find they are also very useful for sharing homework and assignments. You can read more about GitHub Discussions here https://docs.github.com/en/discussions
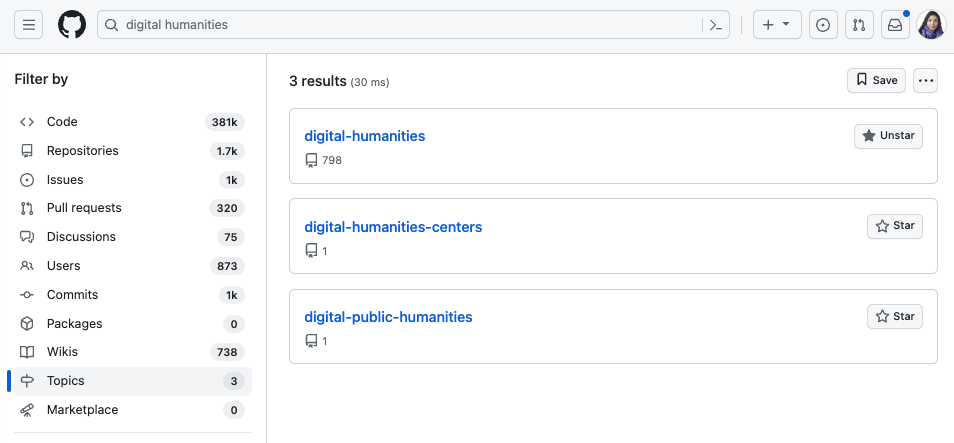
Topics
While GitHub’s search engine is powerful, one way to make your projects for findable is to add topics, which allows you to tag a repository with keywords. For example, if you search for digital-humanities and then click on the Topics tab, you’ll see a list of topics that are associated with repositories that have been tagged with digital-humanities. You can also see how many repositories have been tagged with each topic. You can read more about GitHub Topics here https://docs.github.com/en/github/administering-a-repository/classifying-your-repository-with-topics.
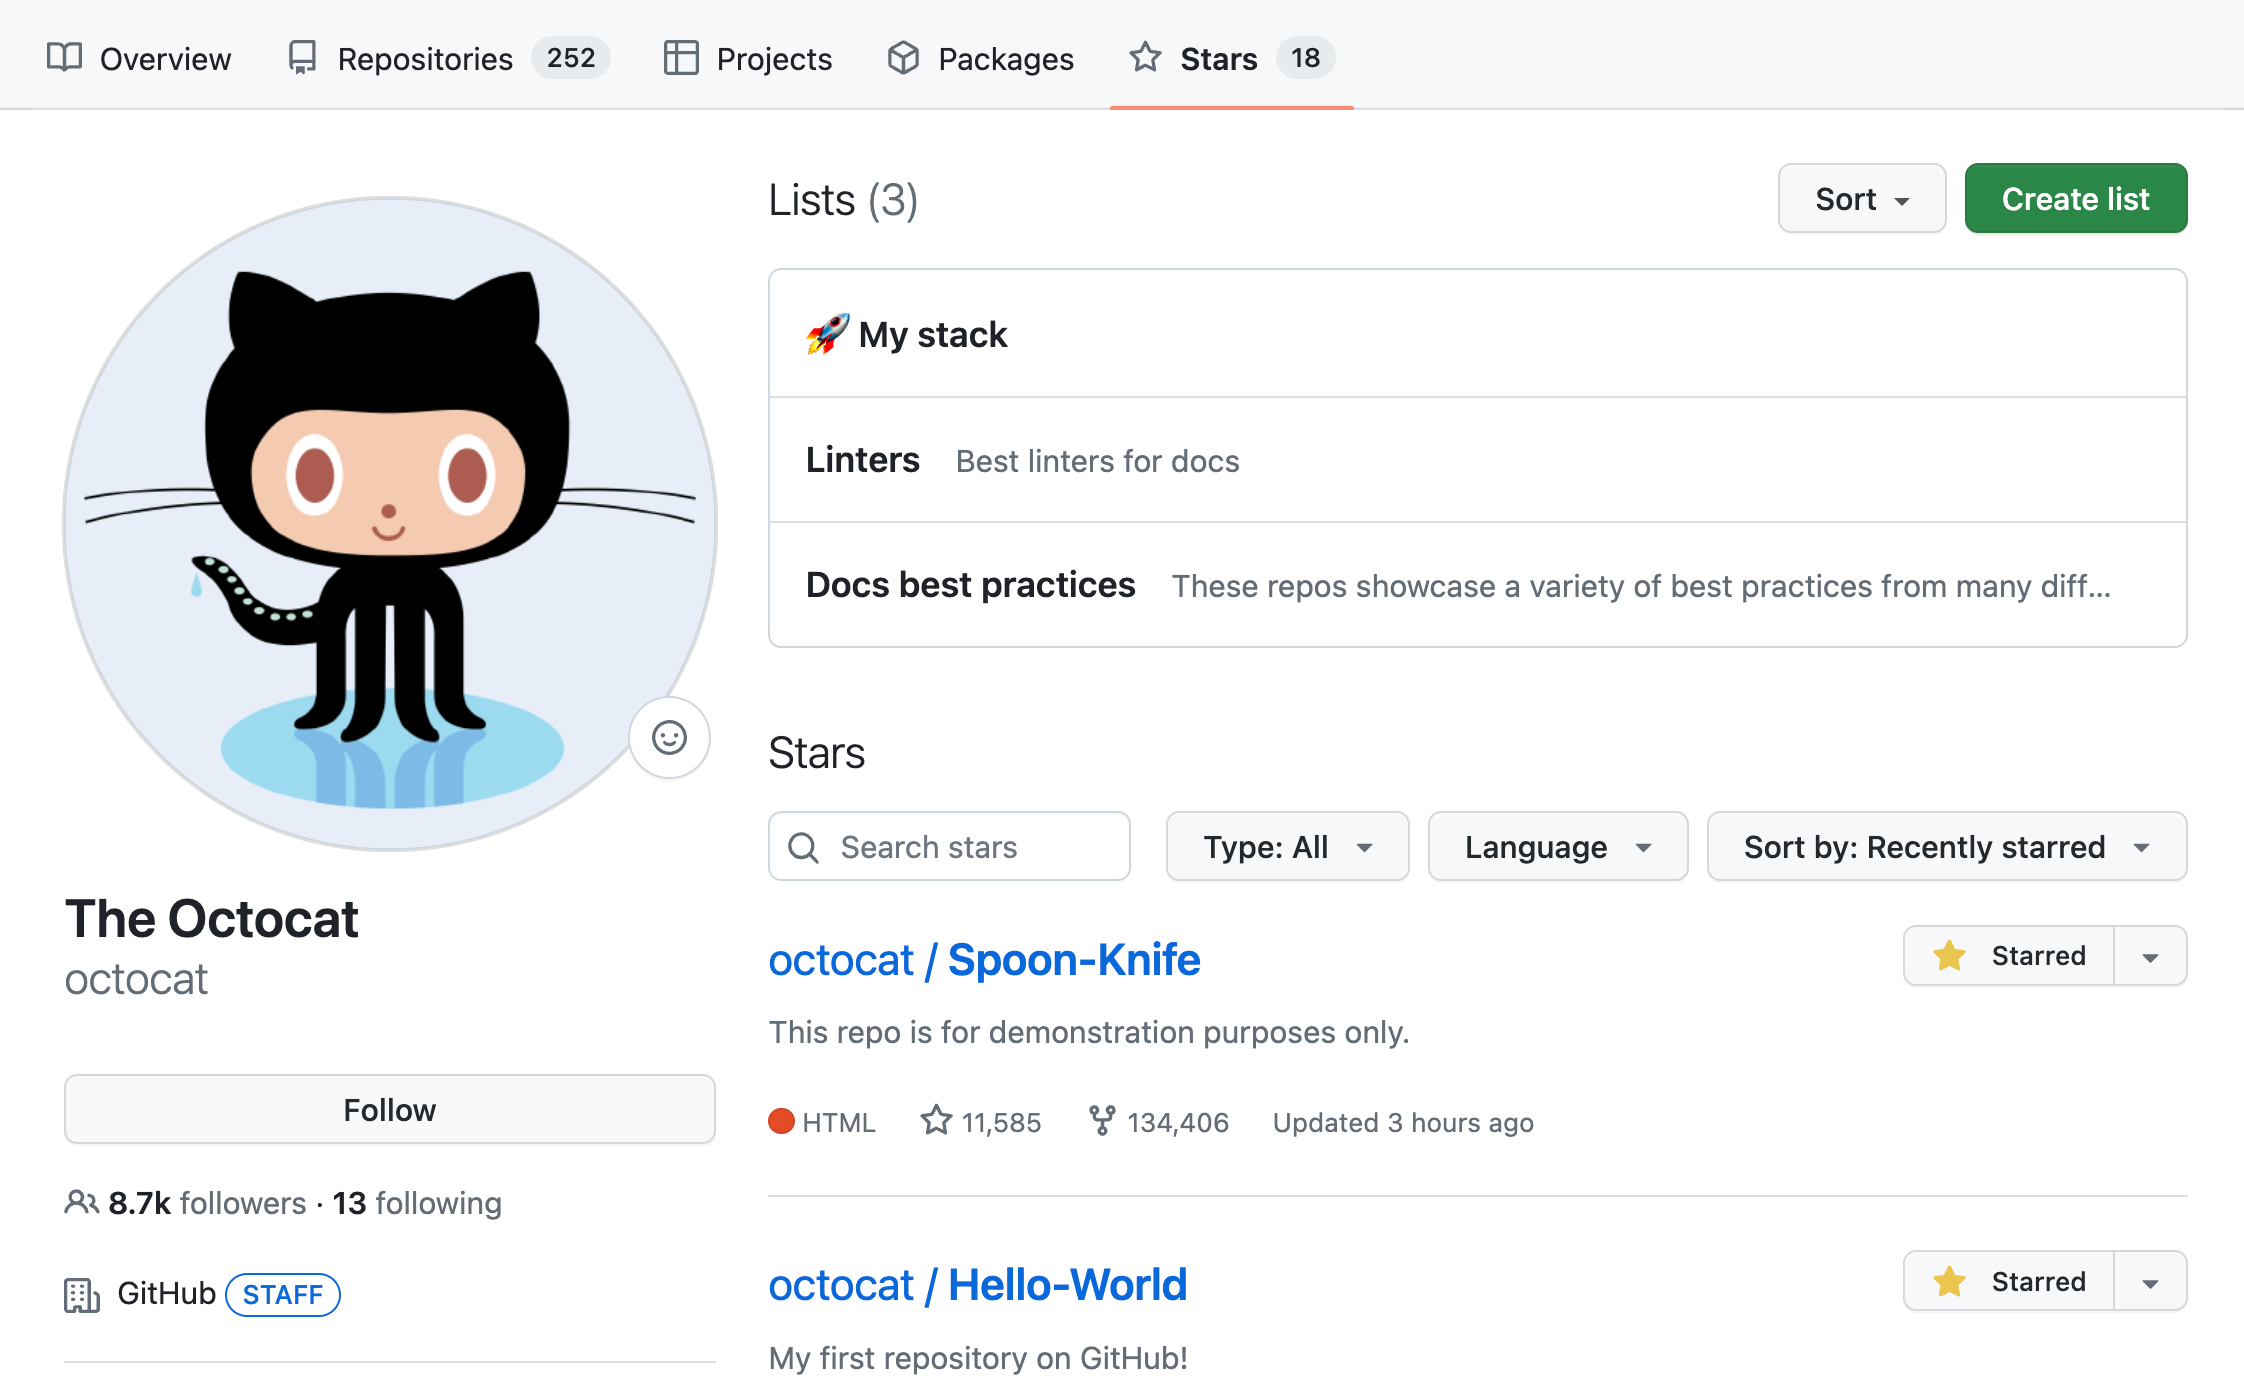
Stars
Stars are a way to bookmark repositories. They are a way to keep track of repositories that you are interested in or want to follow. You can read more about starring repositories here https://docs.github.com/en/get-started/exploring-projects-on-github/saving-repositories-with-stars.
Users
You are all also familiar now with users, since you all have accounts on GitHub. While user profiles are somewhat self-explanatory, there’s a number of features for users that are worth highlighting.
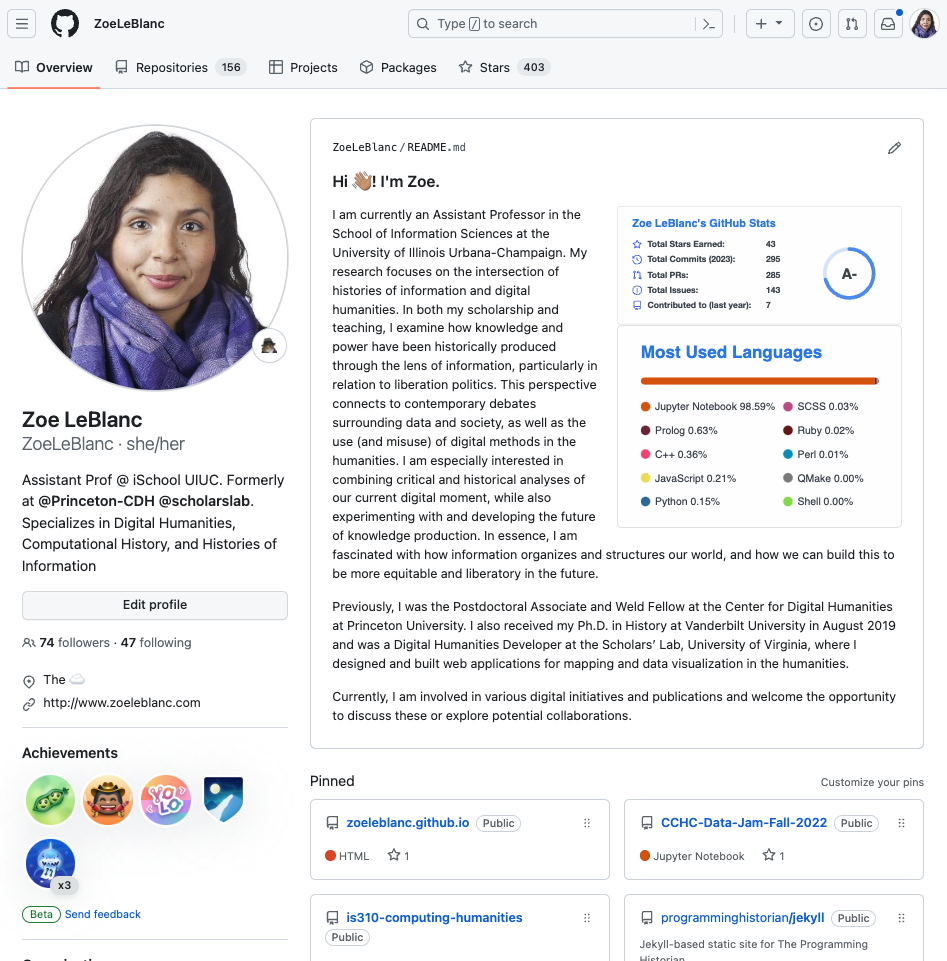
Profile
User profiles are where you can see all of a user’s repositories, issues, and discussions. It’s also where you can see their followers and who they are following. You can also see their activity on GitHub, including their contributions to repositories, issues, and discussions. You can read how to create a profile here https://docs.github.com/en/account-and-profile/setting-up-and-managing-your-github-profile/customizing-your-profile.
We can explore some of these features through my profile as an example.
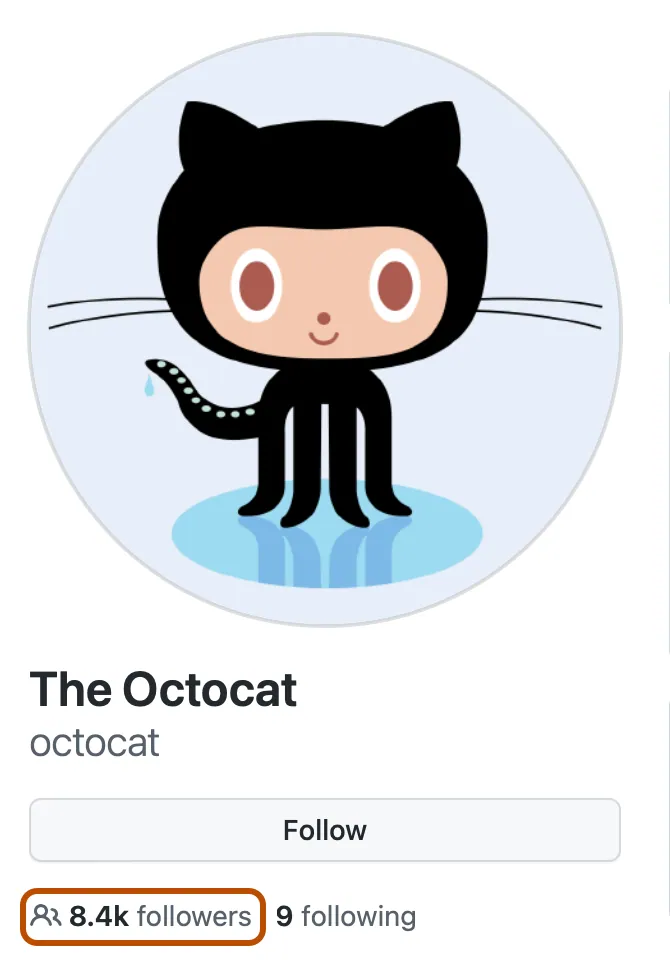
Followers and Following
You can follow other users on GitHub, which allows you to see their activity on the platform. You can also see who is following you. This is a way to build community and find other users who are working on similar projects. You can read more about following users here https://docs.github.com/en/get-started/exploring-projects-on-github/following-people.
There’s still a lot of features we haven’t covered, but these are the ones that are most relevant to our course. If you’re interested in learning more about GitHub, I recommend checking out GitHub’s documentation, which is very robust and detailed https://docs.github.com/en.
Advanced Git & GitHub
While we won’t be using many advanced Git features in this course, it’s worth highlighting a few of them. I want to stress that if you ever have any problems with git, please reach out to the Instructors sooner than later. We are here to help you and want to make sure you are able to use git effectively.
.gitignore
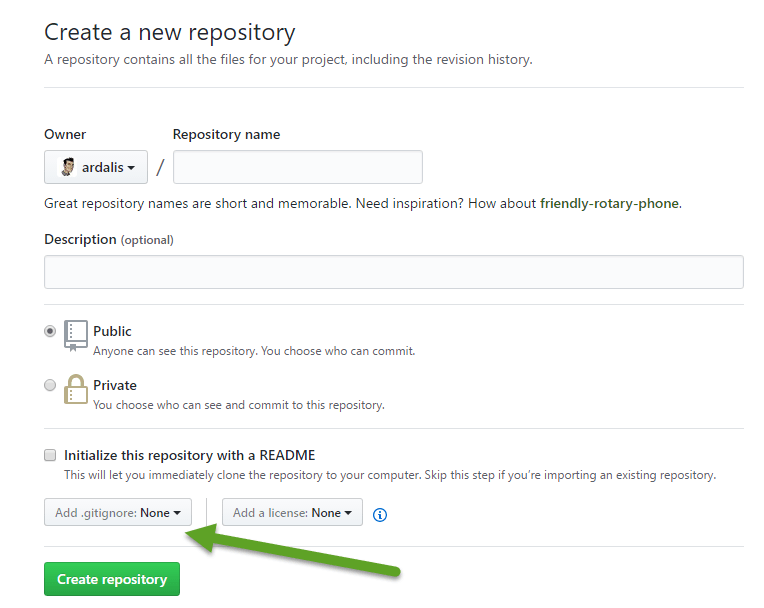
When we first created a repository on GitHub, it asked us if we wanted to add a .gitignore file. We said no, but now we’re going to add one.
Rather than having GitHub create it, we can do it locally:
touch .gitignore
Even though we didn’t add a file extension, .gitignore is a plain text file. But this is a special type of file that lets you tell git to ignore certain files and folders in your local repository. While .gitignore is technically a hidden file (notice it starts with a period), it should show up in your VS Code file explorer or other IDEs.
We usually add any file that we do not want to push up to your remote GitHub repository to the .gitignore file. So if you had a draft file, like test.txt and didn’t want to push it up to GitHub, you would add it to the .gitignore file.
To add the file to the .gitignore file, you can open it in your IDE and add the file name to it. For example, if we wanted to add test.txt to the .gitignore file, we would type in the file:
test.txt
Then we would save the file. Now if we do git status, we should see something like this:
git status
Which would show us something like this:
On branch main
Your branch is up to date with 'origin/main'.

Untracked files:
  (use "git add <file>..." to include in what will be committed)
        .gitignore

nothing added to commit but untracked files present (use "git add" to track)
You’ll notice git is telling us we have a new file .gitignore that is untracked, but does not show us the test.txt file. This is because we told git to ignore it.
Beyond files you don’t want to share (whether that’s work in progress or private information), GitHub also restricts the size of files we can put in our repositories. The limit is 100MB, so if you have a large file, you can add it to the .gitignore file so that it doesn’t get pushed up to GitHub. You can read more about GitHub’s file size restrictions here https://docs.github.com/en/github/managing-large-files/what-is-my-disk-quota and you can read more about .gitignore files here https://docs.github.com/en/get-started/getting-started-with-git/ignoring-files.
Branches
So far we have been doing a very standard git workflow of creating a repository, adding files to it, then committing those files, pushing those to our remote repository or pulling them back down. However, there are a number of other features that git offers that are worth highlighting. One of these is branches.
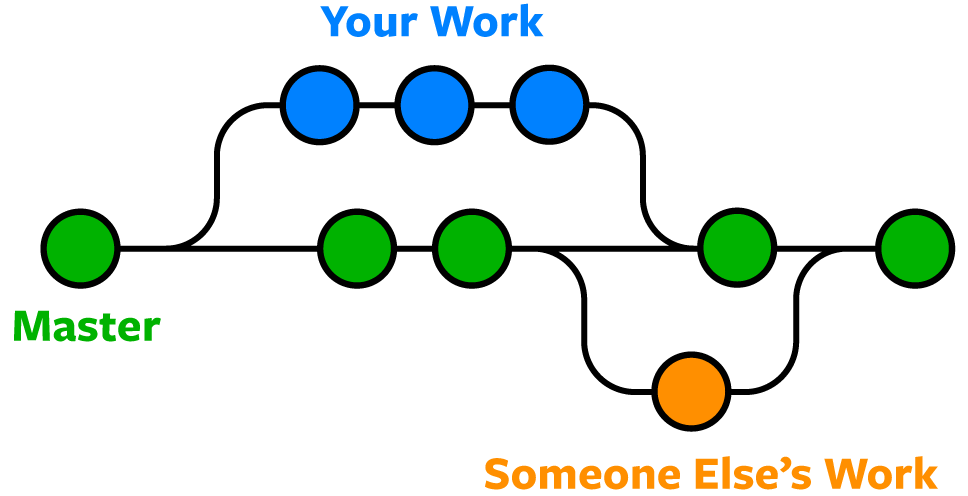
In this figure, we start to see the concept of branches. But first let’s cover why and when you might want to use branches.
Why Branches?
Branches are a way to create a copy of your project that you can make changes to without affecting the main project. You can create as many branches as you want and then merge them back into the main project when you’re ready. This is useful if you want to try something new, but don’t want to affect the main project. For example, if you wanted to try a new feature on your website, you could create a branch to test it out. If it works, you can merge it back into the main project. If it doesn’t, you can delete the branch and try something else.
Branches are also very useful for collaboration. For example, if you are working on a project with a group of people, you can create a branch for each person to work on. Then you can merge them back into the main project when you’re ready. This is a way to coordinate work, allow people to work on separate features or ideas, and then make sure that these paths can be incorporated into the main version of the project or left as a rabbit hole.
For those that are a fan of time travel fiction, you can think of branches as a way to create alternate timelines. This is a bit of a spoiler alert, but in the Marvel series Loki, the main character creates a branch in the timeline when he steals the Tesseract. This branch is then used to create a new timeline, which is different from the main timeline. This is a good way to think about branches, as they are a way to create a new timeline for your project.
How to Create a Branch
Before creating a branch, you should first take a look at what branches you have in your repository. To do this, you can use the git branch command. For example, if we type git branch in our terminal, we see that we have one branch called main.
git branch
* main
This is the default branch that is created when you create a repository. However, we can create a new branch if we want to.
To create a branch, you can use the git branch command. For example, if we wanted to create a branch called new-feature, we would type:
git branch new-feature
This would create a new branch called new-feature. However, we would still be on the main branch. To switch to the new-feature branch, we would use the git checkout command. For example, we would type:
git checkout new-feature
Now if we look at our branches, we see that we are on the new-feature branch.
git branch
  main
* new-feature
However, if we look at our files we won’t see any changes. This is because we haven’t made any changes to the files yet. Let’s make a change to our README.md file, adding some more information.
# IS 310 Test Repository

This is my first repository.

## About

This is a test repository for IS 310.
Now if we save the file, we can start our standard git workflow:
git add .git commit -m "adding more information to README.md"
But rather than pushing the changes to the main branch, we want to push them to the new-feature branch. To do this, we need to use the -u flag with the git push command. This tells git to push the changes to the new-feature branch. For example, we would type:
git push -u origin new-feature
This should show us something like the following:
Enumerating objects: 5, done.
Counting objects: 100% (5/5), done.
Delta compression using up to 8 threads
Compressing objects: 100% (2/2), done.
Writing objects: 100% (3/3), 315 bytes | 315.00 KiB/s, done.
Total 3 (delta 0), reused 0 (delta 0), pack-reused 0
remote:
remote: Create a pull request for 'new-feature' on GitHub by visiting:
remote:      https://github.com/ZoeLeBlanc/is310-test-repo/pull/new/new-feature
remote:
To github.com:ZoeLeBlanc/is310-test-repo.git
 * [new branch]      new-feature -> new-feature
Let’s click on that link and see what happens.
Pull Requests & Merging
When we click on the link, we see a page that looks like this:
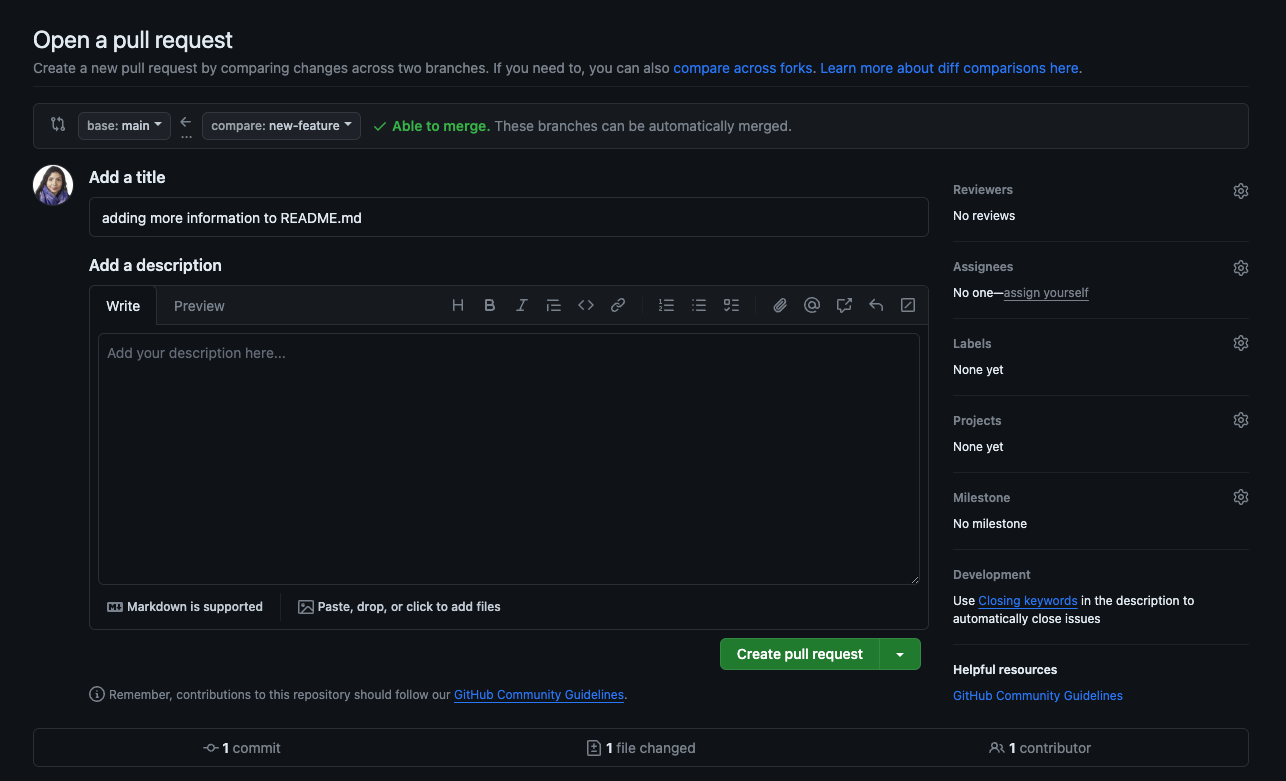
This is something called a Pull Request, which is an interface that GitHub provides as a way to merge changes from one branch into another. In this case, we are merging the changes from the new-feature branch into the main branch. This is a way to review the changes before merging them into the main branch. It’s also a way to discuss the changes and make sure they are ready to be merged.
I don’t expect anyone do any pull requests (often called PRs by developers) in this course, but I wanted to share some core things in case you need to. First, the key thing to pay attention is at the top of the interface where it says base: main and compare: new-feature. This tells us that we are merging the changes from the new-feature branch into the main branch. If we wanted to merge the changes from the main branch into the new-feature branch, we would need to switch the branches.
If everything is good then you’ll see a green checkmark and the message Able to merge. If there are any conflicts, you’ll see a red X and the message This branch has conflicts that must be resolved. If you see this message, you’ll need to resolve the conflicts before you can merge the changes. You can read more about resolving conflicts here https://docs.github.com/en/github/collaborating-with-pull-requests/addressing-merge-conflicts/resolving-a-merge-conflict-using-the-command-line.
You’ll also notice that our commit message is now the title of the pull request. We could also add a description in the Write box, which also allows us to Preview our description. Often this is a good way to add more details to whatever change you’re making to the repository, since commit messages are usually fairly short.
To see a more fleshed out example, take a look at this screenshot from a recent PR on The Programming Historian:

You can see that the journal uses GitHub for its editorial workflow, so Pull Request is where they detail all the changes to an article. This is a way to track the changes and make sure that they are ready to be merged into the main branch. It’s also a way to discuss the changes and make sure they are ready to be merged.
To finish our Pull Request, we need to press the green Create Pull Request button. This will take us to this interface:
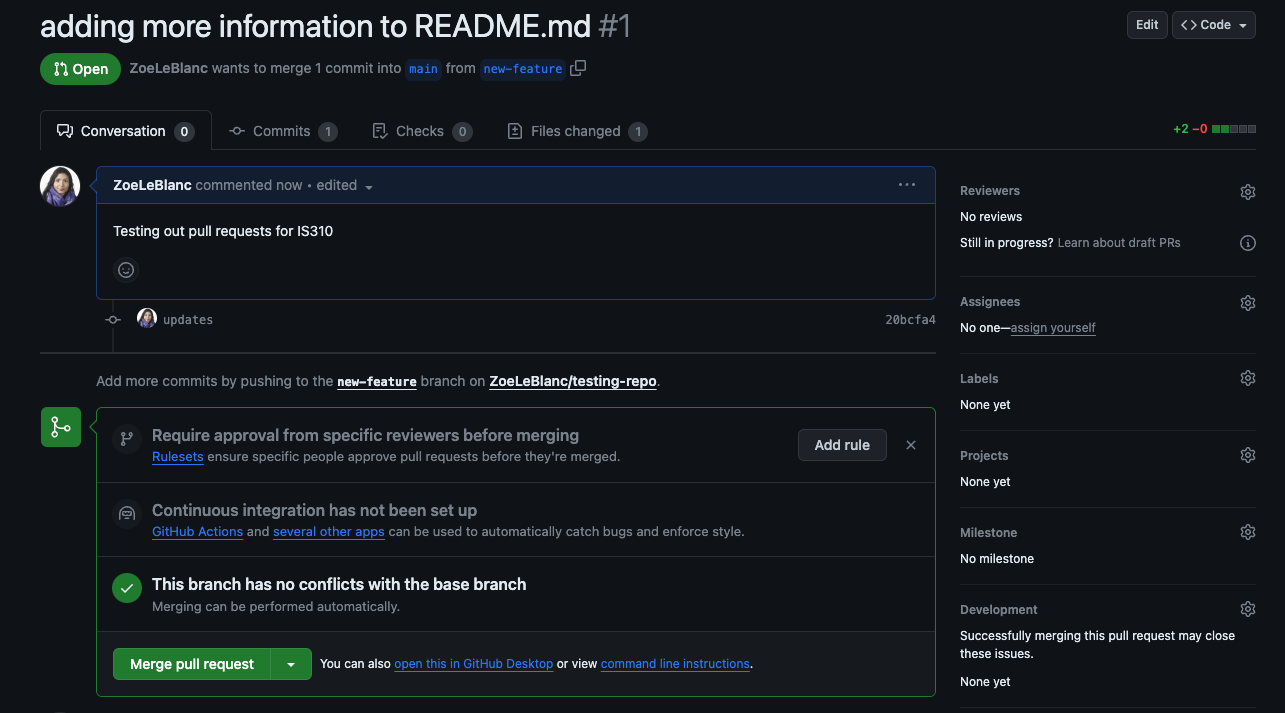
This is the final check to make sure that everything is ready to be merged. If everything looks good, we can press the green Merge pull request button. This will merge the changes from the new-feature branch into the main branch. If we got to the Code tab, we should see the changes we made to the README.md file. Then our final step is to pull those changes back into our local repository. To do this, we can use the git pull command. For example, we would type:
git pull origin main
Now both our local and remote repositories are up to date, and we’ve tried using branches, merging, and pull requests to update our repository. I realize this is fairly advanced topic, so if you want to keep learning more, I would highly recommend taking a look at the Learn Git Branching interactive tutorial https://learngitbranching.js.org/.
Forking
The final concept you might want to try out is forking. While forking sounds like it should involve cutlery, it is actually a way to create a copy of a repository in your own GitHub account.
What’s the difference between forking and cloning?
Forking and cloning are very similar: both make a copy of a repository. The difference is that forking creates a copy of the repository in your own GitHub account, while cloning creates a copy of the repository on your local computer. You can read more about forking and cloning here https://docs.github.com/en/get-started/quickstart/fork-a-repo.
Forking is most useful when you want to make changes to a repository that you don’t own, but you also want to keep getting updates from the original project. So example might include a website theme or a template for a project. You can fork the repository, make changes to it, and then pull updates from the original repository. This is a way to keep your fork up to date with the original repository.
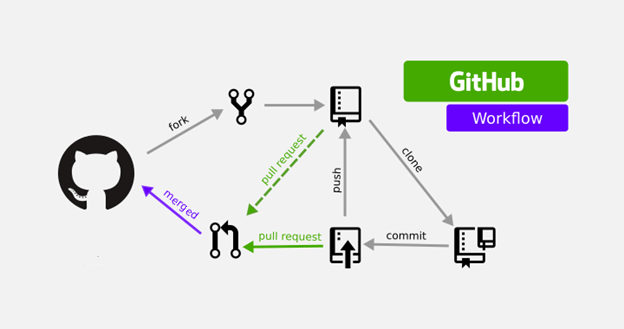
This diagram helps to illustrate our full git & GitHub workflow:
But remember these are advanced concepts so if you have any questions, please reach out to the Instructors and also check out the resources below.
Git Commands Cheat Sheet
| Command | Use |
|---|---|
git init |
Initializes a Git repository in whatever directory we are located in. Remember to do pwd to check if you’re in the correct directory. Also you only want to run this command once. You should be able to tell if it active in your terminal, but in case you’re unsure you can do whatever command we do for showing hidden files because git init creates the .git folder. |
git add . |
This command adds our file to the staging area. You’ll notice here I’m not writing the file name but using .. While you can write each file name individually, it is very tedious. Instead, you can use the . and that will include all files that have been changed in your directory (unless they are in your .gitignore file). |
git commit -m "MESSAGE" |
This command commits our staged files and lets us write a commit message about our changes |
git remote add origin URL |
Connects our local repository with a remote repository (that is one on GitHub) at the specified URL |
git push origin branch_name |
Pushes our local changes to the specified branch of the remote repository |
git pull origin branch_name |
Pulls any new changes from the GitHub repository into our local repository |
git branch branch_name |
Creates a new branch with our specified name |
git checkout branch_name |
Switches to the specified branch |
git log |
Outputs a log of past commits (snapshots) with their commit messages |
git status |
Shows our current status, including what branch you are on and what changes are staged or un-staged |
git clone URL |
Makes a clone of the repository at the specified URL |
Resources
- Your best resource on GitHub will always be the documentation https://docs.github.com/en
- Julia Evans’ documentation on git branches https://jvns.ca/blog/2023/11/23/branches-intuition-reality/.
- Julia Evans’ zine on what is inside of .git folder https://wizardzines.com/comics/inside-git/.
- Shane Lin’s textbook Git for Humanists https://shane-et-al.github.io/git_slab/